University of California, Irvine
Instructor: Dr. Barbara J. Becker
|
Spinning and Weaving
|
Spinning There are many informative websites on drop-spindle spinning and I encourage you to hunt around until find one that has the right blend of text and pictures to get you started. Here are some that I have found [each link will open in a new page]: Twine Project, from Caveman Chemistry, by Kevin M. DunnThere is no one way to spin and you'll find yourself developing your own "best" method as you go. Learning from pictures and text (acquiring episteme) is not the same as learning from someone who is skilled in the craft or by simply trying your own hand at it (acquiring techne). There's something to be gained from both. Just remember: frustration is a positive force that impels us to seek new and better ways to accomplish a task!! Each of you should now have three things to begin your spinning project:
|
If you'd like to see some short, but informative videos to help you get started on your spinning project, click here [page will open in a new window]. Weaving Start looking for a piece of stiff cardboard (about 6" × 12") to use as your loom.
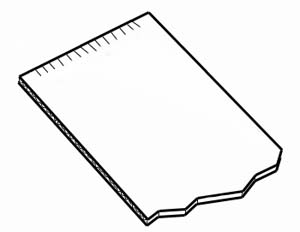
Here are some suggestions on how to prepare your loom: Mark off a 4-inch line centered on each of the short sides of your cardboard rectangle. Using a ruler, divide the 4 inches into evenly spaced segments. I made each of my spaces one-eighth of an inch wide. You can make yours wider or narrower if you like. Using scissors, cut a small slit in the cardboard at each mark.
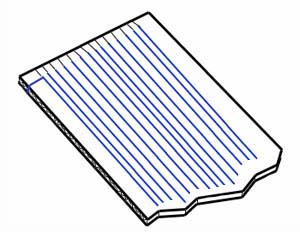
Now you're ready to warp your loom. Tie one end of the warping thread to a corner of your loom. Insert the thread into the closest slit. Stretch the thread across to the opposite side of the loom and insert the thread into the first slit on that side. Loop the thread around the back of the loom and into the next slit. Stretch the thread across to the opposite side of the loom and insert the thread into the next slit on that side. Continue until you've got threads in every slit.
From a roll of wide tape, cut a strip that is as long as your loom is wide. Position the tape over the slits to secure the ends of the warping threads so they won't come loose while you are weaving.  Your final product should be approximately 4 inches wide. Its length will depend on how much thread you were able to spin from your bag of wool.
Now that you have spun your yarn and woven your cloth, reflect on your experience in converting a raw material into a finished product. Gather up your fuzzy thoughts, tease them out and spin the web of your own ingenuity. How did you get started? How did you manage each step of the process from spinning to removing your cloth from the loom? How did you learn and master the techniques necessary to complete your project? What challenges did you face? What resources did you consult? What/who was the "best teacher" in helping you meet your challenges? What will you do differently next time? What else, if anything, besides spinning and weaving did you learn from making your own piece of cloth? Click here to see the wares and read the tales spun by the intrepid class of 2004.
|
|